After a bunch of research on how to make them, I decided to just jump in. I closely read the information and watched the videos on this site.
http://www.stainlessheaders.com/mandrelbends
They have an amazing mock up system that they will loan out if you want to design your own set of headers that they will build for you. Check them out for yourself.
I found a set of header flanges for $60 for the pair. Here's where you can order a set of Coyote flanges.
I started the mock up by securing the collector where I think it should go. I consulted a ton of pictures online to see if I could get the collector to come as close to stock position as possible. The collector I used is an old set I had from my Ford Galaxie rebuild from many years ago. These parts didn't make the cut on the Galaxie due to clearance issues. I knew keeping them would come in handy someday. Here's a shot of the collector secured in place.
.jpg)
Not too high tech, but it gets the job done. With the collector in place I used 1 1/2 inch sprinkler PVC to help lay out each header pipe. I used 45 degree and 90 degree bends only since that is what I can find in header pipe. I will be using 1 7/8 inch header pipe. The 1 1/2 sprinkler pipe is almost exactly the same size OD as the header pipe I will order. Here's a shot of the first pipe done and the second one on its way.
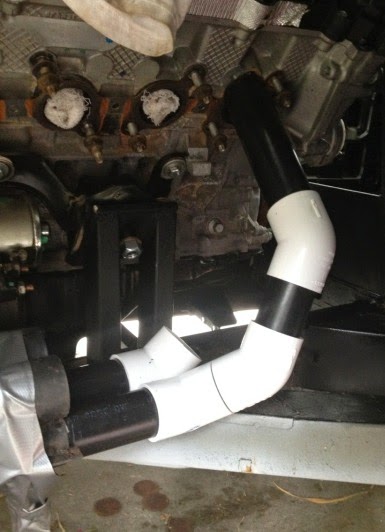
After a few restarts to get the lengths as close as possible I ended up with the following. I decided to only do the passenger side for now just to make sure I can actually complete this project.
.jpg)
Not bad if I say so myself. With this mock up I was able to determine how many 45's and 90's I needed to weld up my own headers. I ordered the tubing from a company in Minnesota. I don't have the name or contact info for them right now. As soon as I receive the piping I'll update this post.
After I received my 45's and 90's it was time to see if I could match the mock up with actual steel. I started by checking out the fit between the header flange holes and the actual bends I ordered. It was tight to say the least. I decided that I needed to do a little grinding on the flange holes to make the pipe easier to fit. In the shot below you can see the differing appearance between the stock hole and the one I modified to fit the pipe better.
.jpg)
I also did a slight modification to the set of collectors I had laying around. The collectors were made for a 2" pipe, the Coyote engine uses 1 7/8" pipes. I took 4" long pieces of 2" pipe and put them into the collectors. The 1 7/8" pipe slips nicely into the 2" pipe. Once welded I think this will be more than enough of a fit to make the system work well. Here's a shot of the collector showing what I'm talking about.
.jpg)
Once all the flange openings had been modified it was time to see if I could make the bends I ordered match up to the mock up I made. It was surprisingly easy. I want one pipe at a time starting with the one that had the most bends to it thinking that I would need the most room to make this one happen. Here's a shot of that first pipe.
.jpg)
I lightly tacked up all the bends cut to fit into place. I continued one pipe at a time until I got three of the four exhaust ports piped up to the collector. I saved the fourth one to be done off the car so that I could more fully weld up the pipes to the collectors. That way only one pipe will have an incomplete weld at the collector. Here's a couple shots showing the other two pipes going into place.
.jpg)
.jpg)
Here's a shot of the finished product off the car.
.jpg)
There were only two places where I had to do a little custom bending. To do this I simply cut a V in the pipe, bent it to the angle I wanted and rewelded it up. This gave me room to tweak the pipe where I needed to to get it just right. One of the most important places I found this a necessity was on the port closest to the front on the passenger side. I had to sightly bend the pipe away for clearance for the A/C hookups off the compressor.
I also had to do some pretty bit weld fill ins at a couple mating junctions where some of the bends came together. This was due to some inaccurate and not so straight cutting methods I did on the bends. Not a big deal, just required a bit more time behind the welder.
Now all I need to do this make this same header in an almost mirror image for the driver's side. I'm thinking of just using the same mock up as my template as a mirror image. If anything comes up of this process I'll post it then.
This was my first attempt at making headers. I have to say I like how it all turned out. The pipes are close to the same length (within less than 2" from the longest to the shortest). I know this discrepancy in lengths could have been and probably should have been smaller, but for not ever having done this before I'm more than pleased with the results.
No comments:
Post a Comment