My car was missing everything. There was one piece of cut off 3/4" tubing in the center console well for the heater piping. That had to come out and it was quite the job getting that thing to separate itself from old 3854. With this little project out of the way I could get on with figuring out how to best plumb the Coyote in the Pantera.
My first thing I decided to figure out was how to give myself more room where the heater hoses come in to and exit out of the Coyote engine. As I have explained in an earlier post the thermostat housing has a strange set of hoses that I don't think can be replaced with more conventional hose and hose clamps. Unfortunately the top radiator hose sticks into the passenger compartment. I have had to build an enclosure on the fire wall to take that into account. All I kept thinking was there has to be some way to give myself some extra space here.
I took off the upper part of the top radiator hose where it connects to the thermostat housing on the Coyote. This is one of those clip connections that are everywhere on modern engines. Nice design but not easy to modify. The female part of the connector has a grove that keeps it from rotating when attached to the housing. I noticed that if I made a new grove I could rotate the hose away from the passenger compartment and give myself a little more room. And, that's what I did.
Unfortunately I don't have the pictures of this modification but it is easy to do after you see the inside of the hose connection. I did have to remove a portion of the tab that goes into the new slot so that the connector clip would seat fully when snapped close. A really nice and relatively simple modification. You will be able to see some of the results from the pictures below.
With that mod complete it was time to figure out how to get it all plumbed up. I found a picture of the cooling flow from a Ford document on the Coyote.

This shot came from the following pdf. http://www.fordracingparts.com/download/instructionsheets/FordInstShtM-6007-A50NA.pdf
Lots of other good info on the Coyote here as well. A good resource to keep around.
After studying this diagram and comparing it to the flow of the original 351C I decided that I needed to purchase the Coyote radiator reservoir rather than using the original reservoir that came with the Pantera. Although the price was right - $60 on Ebay - the original reservoir is one of the few parts that came with 3854. I'm sure someone will want to purchase the original I have since it is in pretty good shape.
With the flows all figured out I decided to take a run down to the scrap metal store and pick up some 1.5 OD stainless tubing for the lines under the car that run from the engine bay to the front were the radiator will be. I installed the tubing in 6' lengths. This is too long for the front but I will wait until I have the radiator to trim the length to where I want it.
With the stainless tubing in place I needed to figure out how to get the inlet and outlet tubes (both 1.5" ID) to the underside of the car. For the inlet tube (the one running to the bottom of the thermostat housing) I used two pieces of pre-bent 1.5" radiator hose I got from my local part store. I purchased one P/N 22484 and one 21953. Both of these have two 90 degree bends that can be cut and used to get the water to flow around where I want it to go. Here's a shot of the two hoses I purchased.
.jpg)
I used the intact 22484 to go from the bottom part of the thermostat housing, around the alternator and it ended up just above the frame close to the stainless tubing running to the front of the car. I then cut one of the 90 degree bends out of the 21953 part and attached that to the stainless steel tubing. To connect the two pieces together I made up a nice 45 degree bent piece of stainless tubing. With a bunch of water hose clamps I was able to tie it all together.
Here's a shot of the the amount of the 90 degree part I took out of 22484 and how it will connect to the 21953 piece.
.jpg)
This is a shot of what the 45 degree tubing I made looks like. Notice the weld on the end of the pipe. I decided to weld a bead along all ends to give the tubing and hose clamps something to grip against. Don't know if that will make any difference to sealing but I thought it would be good idea.
.jpg)
That finished up the inlet side. Now for the outlet side of the thermostat. For that one I used a piece of the original hose that came on the Coyote engine along with the rest of the 21953 hose. I connected them with an appropriate sized (about 4") piece of stainless steel. Once clamped together it connected right up with the other piece of 6' stainless running to the front of the car. Here's a shot of the upper piece from inside the passenger compartment.
.jpg)
The heater hoses were a bit of a chore. I had a part of a 3/4" pipe in the center console that was left over from the original layout. Unfortunately someone had cut the pipe down for some reason. It took quite a bit of work to get that old pipe out. Once gone I used two pieces of new 3/4" stainless tubes to run from the back of the car up to the front of the passenger compartment.
I purchased two pieces of 3/4" pieces of molded hose for the 90 degree bends. I figured that by cutting the 19604 and 19666 pieces I could get two 90 degree turns if needed. I ended up only using the 19666 piece by curing it exactly in two.
.jpg)
In order to get the the heater hose turned up from the center console into the heater box area I made a two 45 degree pipe turns as shown below. Using a 3" piece of 3/4" tubing and two clamps I connected the 45 to the stainless pipe in the center console.

Using the two 90 degree turns cut from the 19666 piece of molded tubing I was able to turn the heater hose to the spot where I wanted it to come out near where the heater box will eventually be. In order to enable me to get the hoses exactly where I wanted them to be I decided to cut out a chunk of the center console as shown below.

I then cut a piece of 13 gauge steel to make a cover for the hole I cut in the console. I attached the plate using six sheet metal screws. A little paint and it is ready to go.
.jpg)
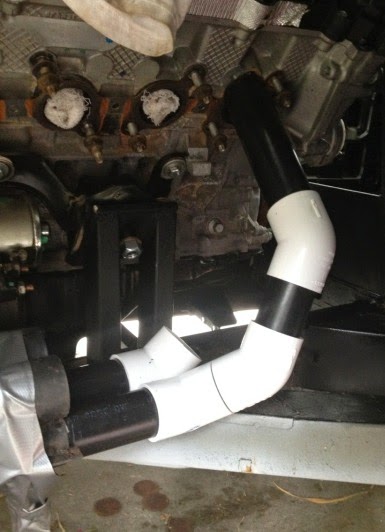
Here's what it looks like in the engine compartment. I still have to get some clamps on the heater hose connections. After that it should be good to go.
The coolant reservoir tank arrived from Ebay. Although it is plastic, it is a really well made part. I decided to mount the reservoir tank right above where the fuel tank would be going. I might relocate the fuel tank to the other side anyway so this space might is something I could use for something else in the future. I made a bracket out of 13 gauge steel to mount the reservoir. Here's some shots of the bracket and the tank mounted in place.
.jpg)
.jpg)
.jpg)

More to come on the radiator selection and connections at the front of the car.
I then cut a piece of 13 gauge steel to make a cover for the hole I cut in the console. I attached the plate using six sheet metal screws. A little paint and it is ready to go.
Here's what it looks like in the engine compartment. I still have to get some clamps on the heater hose connections. After that it should be good to go.
The coolant reservoir tank arrived from Ebay. Although it is plastic, it is a really well made part. I decided to mount the reservoir tank right above where the fuel tank would be going. I might relocate the fuel tank to the other side anyway so this space might is something I could use for something else in the future. I made a bracket out of 13 gauge steel to mount the reservoir. Here's some shots of the bracket and the tank mounted in place.
More to come on the radiator selection and connections at the front of the car.
.jpg)
.jpg)
.jpg)
.jpg)
.jpg)
.jpg)
.jpg)
.jpg)