I looked all over for a dash I could purchase and still haven't found one that I wanted. I have found a couple dash options but they are either 72 models or the owner has a bunch of parts he wants to sell as a package. One guy had a dash and said I could have it and the rest of the parts from his parted out Pantera for $50k! He really likes his parts. Uh, No thanks!
After striking out I decided to fabricate my own dash and see how it looks. I'm modeling it after the 1974 dash. It won't be exactly like it but a close match - hopefully. The challenge with 3854 is that it has a roll cage installed. The cross member and uprights would have made the installation of a stock dash quite the challenge.


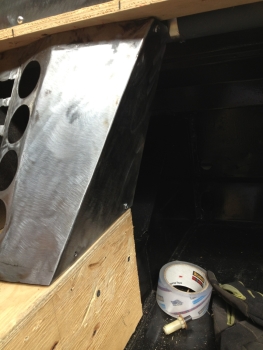
Once I was happy with that I traced the template onto a piece of sheet steel and cut it out.

I traced the metal cutout onto a piece of 1/2 plywood and cut it out. I decided to cut the ears off where the roll cage uprights come up through the dash and will fabricate an appropriate solution around that part of the cage at a later time.
The Pantera has a slight bow to the dash mounting surface so I needed the plywood to have that same bow. I rigged up a contraption to put the bow in the plywood using a cargo strap, a couple of clamps and a piece of 2x6. With a little water on the wood and a day in the sun the bow came out perfect - Thanks Clyde Hovis (my carpenter grandfather - who showed me how to do this when he was bending planks to make a boat many, many moons ago). Here's what the wood top looks like as I was bending it.

Then I started on the top piece that goes above the tach and the speedo. I determined the angles that looked the best and cut out some triangles to give me the height I'm looking for.

Next came the top - a few cuts on some MDF and here she is.

Now I realize everything is very square - all the edges and transitions are very angular. I don't plan on leaving it that way. Ultimately I'm thinking that I will figerglass the wood. That way I can shape it any way I like. I'm a long way from doing that. As you know time usually presents the opportunity to try many, many different iterations to a project like this.
Back to the dash project. I've put it off long enough. Today I decided to mount the top into the car so that I can lay out the rest of the dash front. Putting it in 3854 is a bit challenging since a lot of surgery has happened before I got the car and I have a roll cage to contend with. So - custom brackets are the only way to go. After a bunch of measuring and remeasuring I came up with the following brackets.

The first two were pretty straight forward. I was able to capture two original mounting spots for the original dash and bracket my new top to the car. The picture below shows a closeup of these two brackets. Pretty simple stuff.


Now she is locked into the car in a big way. Better yet, I can easily remove the entire dash top by taking off two bolts and loosening two hose clamps. Quick and easy.
After I locked the top into the car, I started laying out where the dash front will be. But before I can fabricate those parts, I realized I better pick some instruments for the car since I don't have but a couple of the original gauges from 3854. Once I pick the gauges I'll be able to know if the layout is going to work or not.
I finally settled on the SpeedHub set of 6 gauges model no. GR4-258-6 kit. They are 4" speedo and tach and 2 1/16" fuel, temp, oil pressure and volt meter. These are electronic gauges so they have a very low profile - only 1.1" is needed from the back of the gauge panel. This is great since the cross member of the roll cage is right where the gauge will set.
I decided that I really like how the 74 and up Pantera gauge cluster is angled for the speedo and tach. I used a piece of 18 guage metal to bend and shape up the basic panel where the speedo and tach will go. Here's a picture of this piece.

Next it was time to determine how to attach the flat metal pieces to this angled section of dash. To do this I had to first remove the wooden dash top and decide where I want to the dash front to attach to it. After some measuring and eye-balling what would look best I came up with a straight line 1 1/4" from the front edge of the dash top to be where the metal will sit on the dash. I then attached a couple pieces of light weight metal 1/2" square tubing as the mounting surface for the dash front. Here's what that looks like.

I attached the tubing with carrage bolts that were counter sunk into the dash top. The hole will eventually be filled in and covered with fiberglass.

With the mounting surface for the dash front in place I cut some 18 guage metal in rectangles 5.25" wide. These pieces will be welded to the angled part of the dash front. I blended the two pieces together with triangles to give the transition a less abrupt look. Again, this is still in rough form and a bit too anguler - this will change as I refine it down the road.


Next I placed the entire thing in the Pantera to see how she looks. Not bad - still very rough but on the right track.


After looking at the dash front for quite a while I decided I didn't like the bend I put in the left side. I want the dash front to extend past the roll cage uprights. So I cut off the bent part (just can't get that straight enough again) and welded up a new end on both sides of the dash front. The front now extends all the way to the roll cage on both the left and right sides.
Next I had to nip away at the extensions to allow it to wrap around the protruding roll cage uprights. I made a cardboard template and started carefully and slowly taking away metal. After three or for fittings I got it just right. Here's what it looks like off the car with the extensions and the cutouts for the roll cage.

.jpg)
Next I decided that I wanted a little wrap around to go on the ends of the dash front to finish off the look when you are looking at the dash from the outside when the door is opened. I made a template to fit around the roll cage and conform to the door pillar. I welded this to each end of the dash front with a slight angle out from the dash so that it will clear the roll cage upright. Here's what that looks like off the car.


Next I turned my attention to the bottom of the dash. I wanted it to have a lip protruding from the lower to match the look of the upper part of the dash. I decided wood would be the easiest to use to make this piece. This will ultimately be attached to the cross member of the roll cage to give the lower part of the dash the rigidity it needs.
I measured from the front of the dash to the roll cage cross member and found I had a maximum of 2.75" to work with. I ripped a piece of 1/2" wood this size and attached angle iron to them to allow the dash front to screw into it. I left just over an inch that will protrude beyond the dash front. This gives the upper and lower of the dash a bit of interest in how it overlaps the front. Here's what the bottom part of the dash looks like before it was installed.

Now that it all fit properly, I had to remove some of the upper screws to allow me to remove the entire dash from the car. I want to weld the nuts for the cap screws to the upper and lower portions of the dash so that I can remove the dash front if I need to in the future.
With the entire dash assembly removed I reassembled the entire dash and carefully welded the nuts to the upper and lower dash sections. Of course a couple of the screws got splattered by weld slag and I had to redo the nut weld and/or completely replace the welded nut. Second time's a charm and it all went back together perfectly.
Finally I finished grinding off all the welds on the dash front and put it back in the car to see how it looks. I really like how this is turning out. Next comes the center console and instrument cluster face. Here's how it looks after today's work.


With the dash to the point where it is usable and adaptable for future additions, I moved on to the center console. This was a pretty simple project of just framing out the basic shape using 5/16 plywood. This too will be fiberglassed as the project progresses.
I tried to use the basic shape and style of center consoles I saw in other Pantera pictures. I made it so that I would have a more pronounced arm rest in the center where I could store items since the cross bar on the roll cage excludes me from making a glove compartment in the dash. Other than that it is pretty basic. Here's a picture of the center console installed with the gauge front in place as well. More on that project in a minute.

The gauge panel was a lot of fun to make. I was fortunate to have been given an original gauge front with the purchase of the Pantera. This at least had all the holes cut out for the gauges and buttons. I took this piece and modified it to fit my new dash design. I used the same thickness steel to weld up sides and another front for the radio and climate control mechanism to be mounted. Here are pictures of the various pieces rough welded into place. You can see from these photos all the pieces that had to be added to make the unit functional with my design of the dash and the center console.


I then took the rough welded gauge panel and marked on the console and on the dash where it would be attached. I fabricated brackets that matched the angles of the sides, drilled mounting holes and attached the brackets to the center console (4 on the console and 2 on the dash bottom) where I could attach the gauge panel assembly. I welded nuts to the brackets so that I could easily attach and remove the gauge panel when I needed to. Once I was satisfied how it came together I ground down all the welds and mounted it to the console and dash for a final set of pictures.


Not bad at all. It all fits really nicely. I will have to do some grinding to make room for fiberglass when it comes time for that. Not stock but close, plus it fits me much better than a stock set up would have anyway. Now comes all the work to make this angular bunch of metal and wood look like it originally came in the Pantera.
After all the fiberglass work on the dash top and console (separate posts) it's time to smooth out the dash front and the instrument cluster. These both are metal pieces that have been welded together in spots. A little bondo was needed to finish the instrument console. The dash front needs to be modified to add vents. More on that in a bit.
Here's a couple photos of what the instrument cluster looks like smoothed out. Still a couple more applications of bondo is required to get it just right, but this is basically the finished product.
.jpg)
.jpg)