Wednesday, April 26, 2017

Parking Brake

Due to the fact that I decided to use Wilwood brakes I had to come up with a parking brake mechanism for my Pantera. If you check out my post titled "Rearend Rebuild" you will get the details on all that had to be done to get the rear end in shape with the Wilwood brakes I chose. I used WILWOOD MC4 MECHANICAL PARKING BRAKE CALIPERS FOR 0.81" WIDE DISCS to make my e-brake work. It is definitely a little on the light weight side but I think it will work just fine. I did have to do a little grinding on the body of the brake assy to get the pads free enough to install them on the rotors. Not a big deal, but we forewarned. Here's a shot of the brakes I used.


Now the parking brake needs to be pulled from the rear. That made the stock cable and linkage that came on the Pantera obsolete for my application. Good thing, because I didn't have any of the stock parts - remember, this was a junk yard find and almost everything was missing! So it was time to fabricate something that could work on my car.


I started with going through all my spare parts and looking at the various pull cables I collected over the years. I had parts from my old 66 Galaxie and others I pulled from junk yards trying to modify brakes on both the Galaxie and my 65 pickup. I finally settled on an old clutch cable from a 1990 Mustang GT that was the engine and transmission donor for my 65 F100. That cable was almost perfect in size and length for the ebrake on the Pantera. I only had one cable so I ordered a second one for about $40.


While I waited on the other cable to arrive I started to fabricate the arm that will hold the cables in place. I wanted this arm to be pretty beefy while not being too heavy. The picture below shows what I came up with after a bunch of work.


The arm slips over the 10mm bolt that was originally used to hold the stock ebrake assy. I put 10mm sleeve bearings into the arm I made to make sure it slides on the mounting bolt with ease. To the hook on the underside of the ebrake arm in the cabin I fabricated the following adjustable linkage.


This linkage can be adjusted to take up any slack in the system. Pretty simple and not to difficult to make. I know it doesn't look like it came off the assembly room floor, but who cares? This car was destined to be scrap metal so anything I can do to keep it alive is moving in the right direction, IMHO!


I also had to fabricate a bracket to hold the clutch cable ends just behind the pull arm. The photo below shows this bracket that I made and bolted to a cross member under the Pantera.


The clutch cables ends had to be ground down a little bit in order to fit the mounting point on the ebrake itself. I just took my time and made sure that I cut away just enough to give me a tight fit into the brake bracket. Here's a shot of the end of the clutch cable going into the ebrake itself.


I put a nut and bolt to hold the cable into the ebrake assy.

I did a bunch of routing of the clutch cables to get them to go as straight to the front of the car a possible without being interfered with by the exhaust or the shocks. Here's how I finally decided to route the cable. I'm not sure this will be their final position, but it is a place to start.


Then I put it all together. Here's a few shots of the final product.


Works like a champ. I don't have wheels on the car yet so I can't tell how tight the brakes hold. I do know that I can put a lot of pressure on them from inside the car and get them to release when I want them to. We will see how they really operate when we put the car on the road. For now, I think this was a nice clean way to adapt to what I had to do to make her work.

Saturday, December 5, 2015

Wiring

I started wiring up my Pantera over the past couple of months. I have always used Hot Rod Wires for all my auto wiring needs. I know you die-hard Ford fans will cringe at this but it is a GM based wiring system. I hate saying this, but the GM philosophy of wiring is so much easier to work with. Nice part about this company is that the owner is available for phone calls to help with questions on how to wire up the system. I'm in no way an expert at wiring but feel totally confident with this guy's help to make any car do exactly what it needs to do with their wiring kit.

I used their 18 circuit system that set me back around $300. Here's a shot of the system along with a link to their web site. http://www.hotrodwires.com/product/18-circuit-harness.html


I also ordered a wiring diagram for the car I took the ignition switch module from. It took a little digging but having the wiring diagram is critical to marry up the wiring system to the ignition, turn signal, horn, headlights and windshield wipers. After carefully attaching each of the Hot Rod Wires to the ignition module, I'm actually able to turn the engine's starter motor using the ignition key. That's some good progress.

Here's a picture of the "rat's nest" of wires that I am working with. When I have every thing hooked up and tested I will do a little beautification work to get it all looking the way I want it to.


HEADLIGHT DOORS

After getting the ignition module hooked up I decided to tackle the headlight doors. The previous owner had already installed the opening motor and limit switches and had a bundle of wires coming from each connection. After a little digging I found several wiring diagrams for the original Pantera. Now the fun begins.

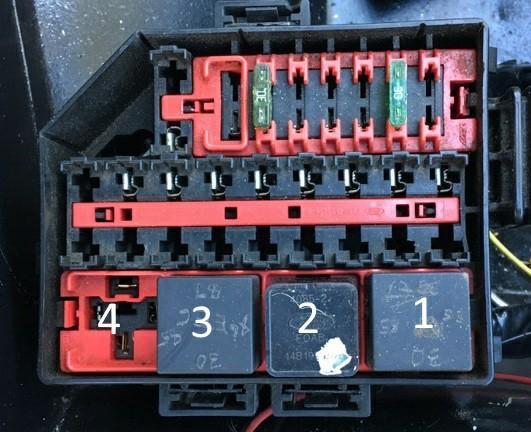
I said earlier, I'm not an expert at wiring up anything. But, after restoring several cars now, wiring is something I just had to figure out. After staring at the original Pantera wiring diagram for the headlight doors, I saw that I was going to have to get creative with the relay setup. I had already pulled a small power distribution box from a small Ford at the junk yard. This box came with slots for four relays. I already knew that I was going to mount this thing in the front boot and use it to control the headlight doors and the radiator fan. Now I needed to figure out how to make the doors work. Here's a shot of the power distribution box I'm using.


Relay 1&2 are used to control the headlight doors. Relay 3 is for the fan motor. The fourth slot is open for some other circuit that needs a relay in the future.

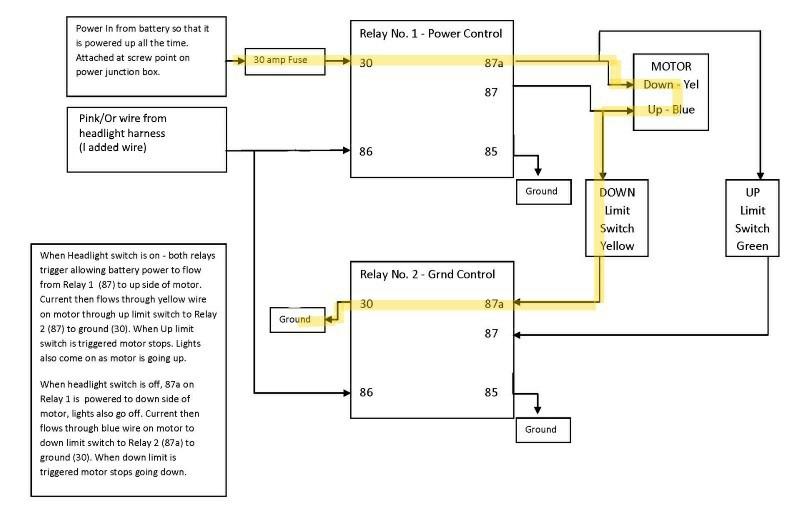
I saw on the original wiring that they used a double throw relay for the headlight doors. I never used anything like this and didn't have the place to mount such a thing. I came up with the following scheme to use normal relays to do the same thing as shown in the original wiring diagrams. The first diagram shows the current path for when the headlight switch is turned on. The second one is when the headlight switch is turned off.


Great in theory, but will it work. I soft wired everything up and, can you believe it, the doors go up and down as I had hoped! I then hard wired it all up and again, it worked perfectly.

More will come on wiring as interesting things arise.

Saturday, September 5, 2015

Defrost and AC Venting

I really didn't think about the effort that would go into making your own dash. One thing I overlooked was how to get air to the vents both for the A/C and for the defroster. I tried a bunch of parts from the junk yard, but none of them would work without major modification. So, time to make my own.

Basically I used a bunch of scrap exhaust tubing and light weight sheet metal to make all the vents. The next three shots shows the center defrost vent for the dash.


I painted up this piece a nice flat black. I then stuck some rubber seals for windows around the sealing edge and screwed it into the underside of the dash. Here's a couple pictures of the two side defrost vents. You can see the white seals I used. 


The A/C vents were pretty easy to make compared to the defrost vents. The A/C vents didn't have as much of a clearance issues as did the defrost vents. Here's a couple shots of the three A/C vents.


These vents will be installed with a set screw attaching them to the vent opening already in the dash itself. Pretty simple fabrications that should do the trick.

Sunday, June 14, 2015

Side Vents

I have seen pictures of the side window treatments that double as vents for the engine bay on Pantera pictures I've seen on the Internet. Just like most of all the other projects on this Pantera, what I want to do is so customized that purchased parts just don't make sense.

Since I don't have any of the window pieces in my parts inventory that came with the car I decided that the vent should cover the entire side window space. I also want the vent to be functional. At least one side will be ported to the intake of the Coyote engine I've placed in the car. The passenger side has to have a fuel fill door for access to the fill tube I installed earlier.

The question was how to make this thing and make it look good. It took three tries to get it where I think it's going to work. The first attempt was to cut out a couple wood pieces that fill the space then spayed on some of that "good stuff" foam on the cutout. That's the stuff used to fill cracks in home construction. I then tried shaping the scoop thinking I would fiberglass the final form. Bottom line - not a good idea. I just couldn't get the shape I wanted - Strike One!

Second try I called the Frankenstein approach. I cut out a piece of sheet metal the shape of the window opening. To this I tacked up pieces of metal shaped to make the scoop. After a bunch of cutting and tacking to try and get the shape I wanted I had to stop. This thing was just plain ugly. I'm not sure I could ever duplicate a second piece - Strike Two.

The third attempt was a winner. Here's what I did. I cut another piece of sheet metal the shape of the window opening. Then I a second piece about 1 1/2" smaller all around the edges. Then I bent the curve I wanted for the scoop opening. Now it had to be welded to the flat larger piece that covers the window. But before I did any tacking I had to attach the flat piece to the car. Here's a shot of the flat piece attached with 4 screws.


To make installation and removal as easy as possible I decided to weld the screws onto the flat piece. Even though the body on my Pantera isn't anywhere near being ready for public viewing, I hate welding directly on the car but in this case I had no choice. Here's a shot of my set up with wet towels to try and protect the body from weld splatter.


Here's a shot of the bent pieces before they were welded up to the flat one.


Next I played with the bent piece until I got it to mate up with the flat piece as close as I could. It took a bunch of bending so that the welding could be done as easily as possible. Here's a shot of the tacked up bent metal vent on the flat piece.


The fit was really coming together so I decided to go ahead and make the other side the same way I did this one. When I had both pieces roughed out I did a little more tacking off the car and then did a little grinding off the welds. I used strips of fiberglass to give myself a smooth transition from the curved piece to the flat over the weld spots. Here's a shot of what the rough glassed piece looks like.


Then is was a matter of smoothing out the glass then doing a bunch of bondo work. Once it was smoothed so that I liked the overall shape it was time to make an opening for the fuel fill on the passenger side. I used an existing door from some other car and traced the shape on the vent. I carefully cut it out.

I used a fuel fill door hinge from an old BMW to mount the door back onto the vent. I had to do a bunch of modification to the hinge but once done it opened and closed just the way I wanted it to. Once the door operated like I wanted I then closed the door and bondoed the door completely closed. Crazy, right? I was told by a friend of mine who did a bunch of body work that the only way to get seams as smooth as possible was to bondo them closed then cut them out just like you want them. Once the bondo dried I used a grinder to carefully cut the seam out just like I wanted it to look. This method also gave me a really smooth transition between the door and the vent. Here's a shot of the final product.


Finally I put a little primer on the vents and put them on the car. Here's the driver's side side view and front view.


Here's the passenger side side view and front view with the fuel door opened and closed.


Next I'll work on putting tubing openings on both vents to give me into the Coyote intake. I'm going to wait to do this after I figure out the air filter box and tubing requirements sizes. Check back for more updates later.

Friday, April 10, 2015

Dash Update

I decided that my first dash design needed a bit of updating. The steering column I installed required that I move the gauge holes up quite a bit. Here's a picture of the problem.


As I played with where the gauge holes needed to be I noticed that the dash itself was in the way - part of the gauges would be blocked by the straight bottom part of the dash. I decided to modify the straight part to give more of an arch. It took a little doing but it worked out pretty well. Here's a shot of how it looks now. 


Now the gauges are so much more visible. It looks really good. 

I also cut in vent holes for the defroster flow to the windshield. The vents came out of a mid-90s Ford Escort. They were the small vents on the front of the dash. They were just the right size for my design. There's one more vent you can't see in this shot all the way to the right side of the car. Here's what it looks like all primed. 


Also I did a little grinding to get the A/C vents to work properly. Here's a couple shots of the front of the dash with the vents installed. There's another vent on the driver's side that isn't shown in the pictures below.


Now the dash is ready for texture and final paint. I also need to to design and install venting behind the dash. More on those projects in future posts.

Friday, March 20, 2015

Exhaust Pipes and Mufflers

I knew I wasn't interested in paying the high price for anything remotely close to stock. After doing a bunch of measurements I finally decided that the 12" glass packs from Van Pelts Sales (www.vanpeltsales.com - Part Number FMT-1218G). They measure 12" for the muffler and are 18" from end to end. Total cost $35 per muffler. I bought 4 of them to give the Pantera exhaust that double tip look sticking out of each side.

Next step was to turn the two mufflers into one. I simply welded them together and made my own Y-pipe using various pieces of stainless steel pipe I have around. Here's a shot of the muffler assembly.


After positioning the muffler in place, at the angle I wanted it to sit on the car I was able to start to see how I needed to bend up a piece of pipe to connect the muffler to the header. Immediately I found that the collector on the header was sticking too far back for me to make something fit. Out came the cutoff tool for some modification to the header. Here's what the new collector looks like.


Here's what it looked like before a bit of grinding and welding.


Then came a bunch of cutting, bending and welding. It took about 10 or more cuts to get the pipe to zig zag to where it needs to be so that it goes from the header to the muffler. For all you purist out there, I know that the non-mandrel bends isn't as efficient, but I don't care. I just wanted to get this thing done and this was how I could do it on my own for VERY low cost. Here's a shot of the finished pipe off the car.


This series of shots shows the entire assembly on the car.


You can see that I used the original hanger in the stock location. Here's a shot from the back of the car with the exhaust completed.


Here's a shot of the back of the Pantera with both exhausts completed.


I have a set of chrome tips that I will install as I get closer to completing the car. Not a bad result for less than $200! Can't wait to hear it start up.

Monday, December 8, 2014

Steering Column with Detachable Pantera Steering Wheel

I have been thinking long and hard about what I'm going to do about making my steering column do all I need it to do with turn signals, horn, etc. Frankly I haven't been too excited to take this project on.

One day I was at the local pick-a-part yard looking for something for another project when I came across a really weird looking two door hatchback. It kind of looked like a Mustang but not really. I couldn't find any badges on it (other than a Ford badge). I ran the VIN and found it was a 1984 Ford Escort made for sale in Canada.

I just so happened to look at the steering column and saw that the ignition had the key in it. Not something you see to often at this particular pick-a-part place. The turn signal and windshield wiper switch both felt solid, as did the ignition switch. I really liked how it was all built in a relatively compact way around the steering column. The other thing I liked about this set up was the fact that the horn is located on the turn signal arm itself. I really didn't want to try and figure out how to get a horn working on whatever steering wheel I ended up using on my car. I decided to take the assy apart and check it out as to how it might fit on the Pantera.

It came apart really easily. I took with me the entire plastic cover and the steering shaft itself. I ditched the steering wheel and all the couplings since I had plenty to choose from from the parts I have from the Pantera. Sadly I elected not to take the windshield wiper motor and before I could get back there the car was sent out to be junked. The entire steering column assy cost less than $45! I figure that if something fails to work it should be a part that can be purchased from the local parts store for a decent price.

I knew that the current steering shaft would need to be heavily modified to make this assy work if it was to work at all. When I got the parts home I started marking up what needed to be changed. I decided to use the steering shaft from the Escort and weld on the end of the old Pantera's shaft to enable it to be attached to the original couplers. Here's a couple pictures showing that process.

This first shot shows the two shafts. The Pantera shaft is the one on the bottom. If you look close you can see a black line showing where I need to cut the shaft to weld it to the bottom of the Escort shaft shown above the Pantera shaft.


This shot shows the two shafts welded together. I used angle iron to help center the two shafts together (with some shims since the Pantera shaft was about 0.030" smaller in dia than the Escort shaft) and to keep them as straight as possible. It came out pretty good.


By using the Escort shaft I was able to use the Escort's turn signal switch canceling feature. I had to cut the Pantera's steering shaft housing to fit the Escort's ignition switch internals. Basically two slots had to be cut into the housing to help secure the ignition switch. I also had to lengthen the steering column housing by about 1 5/8" to fit everything into place. Also, two sets of tabs had to be welded onto the Pantera's steering column housing to mount the assy from the Escort. It came out amazingly good. Here's a few shots of the assy with a Grant, quick release, removable steering wheel.


I then took the assembly and went to bolt it up into the Pantera. I already knew that my custom dash was going to have to be modified to make this thing fit. Turns out that the previous owner had mounted the steering column in a manner that made the steering wheel closer to the floor pan of the car. This in turn made me position my gauge holes and the entire gauge face too low for the car.

Out came the angle grinder and cutoff wheel. After a few whacks I had the assembly ready to fit into place. I will need to take out the dash face and relocate the gauge holes up at some time in the future. I found when I mounted the steering column assembly that the back end of the Escort electronics were hitting my dash and the wiper switch arm was way too close to the dash panel as well. I decided that I needed the steering column to come closer to the seat by about 1/2".

I welded some tabs to the back mounting holes on the steering column tube and drilled out new holes on the front tabs. This enabled me to shift the entire steering column assembly out where I needed it. Here's a shot of the modified steering column mounting assy.


After bolting it all up I took a long hard look at that Grant steering wheel and didn't like what I saw. I have an original Pantera wheel - in rough shape to say the least but still an original one. I really like the size of the original wheel and know I can get parts to make it look good from different vendors. I really like, no I think I really need the detachable wheel option that the Grant wheel offers given that I'm 55+ and 6'5" tall. Getting in and out of the Patera will really be expedited if I could remove the steering wheel.

As I sat there looking at the two wheels I decided to modify the Panteral wheel to make it detachable using the quick release mechanism from the Grant wheel. To modify the existing Pantera wheel I cut off the bellows part of the wheel that mounted to the steering column, leaving only about 3/16" of an inch protruding from the back of the wheel.

I then made a bracket with three holes to mount the quick release mechanism out of sheet steel. I used the existing quick release brackets as a template to lay out the mounting holes. I cut the sheet steel in a circle to fit just inside the remaining small piece of bellows on the back of the original Plantera wheel and welded it all up. Here's a couple shots showing the fabrication process.


The wheel now snaps in and comes out like a breeze. Here's a shot of what the wheel looks like attached to the shaft using the quick disconnect feature.


Here's a few shots of the entire assembly installed in the Pantera, with and without the Patnera wheel in place.


In that last shot you can really see how much adjustment I need to make on the holes I cut out for the gauges on my instrument panel. That modification will be discussed in a post later on.

OK - Here's an update on the column. As I was working on moving the gauge holes up to where they need to be (see post on dash manufacture to read that update), I saw that I needed to so something with the big open space behind the steering wheel. I just didn't want to be looking inside the steering column as I drive the Pantera. So - time to make something. Here's a shot of the problem.


The steering wheel just isn't big enough to cover all the stuff crammed inside the steering column. I started the process by cutting a piece of round metal sheet the size of the opening in the column. I put a hole in the middle of the round plate that enables me to slide the plate over the mounting nut of the removable steering wheel. The plate will be screwed into the cast and tapped guts of the column itself. Here's two shots showing the plate in place.


You can see that I tacked a piece of exhaust pipe to the plate so that it would mate up to the quick disconnect part of the steering wheel. Now I want to taper that insert so that it will look better when mounted in place. To do this I use a great tool - Great Stuff sealer. See the shot below.


I love using Great Stuff as a base for shaping parts that I'll be making with a fiberglass top coat. The Great Stuff expands and fills all the gaps on metal or wood. It also expands to where you can shape it when it dries. It takes about 3 hours to be ready to work with. When it dried I was able use my wife's good bread knife (shhhh - don't tell her) to cut it with the taper I wanted to make this hole in the column look right. Here's a shot of the part at this step in the process.


Now comes the messy part - fiberglass. When I first lay the glass it looks terrible. Here's a shot of the next phase the process as the glass dries.


With a little sanding and some bondo the mess above turns into something really different. Check out the shot below - doesn't even look like the same thing as above.


Here's what it looks like in place on the column.


After a little extra grinding to get it all to fit in place I was ready to prime the new part. This is a quick way to finish off parts that are being modified to fit something it wasn't designed for in the first place. Not a bad result, even if I do say so myself.